skip to main |
skip to sidebar
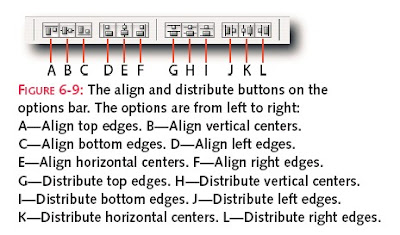
Making image collages, images bound for the Web or for multimedia output, or even arranging some simple layout which I believe there are designer still doing it, can often require you to align or distribute content that has been spread over different layers. You can use the clunky method of creating guides and grids and then employing the Move tool to place the content, or use more graceful, easier, and overall, is faster moreover more accurate methods. One such method involves the Move tool and its options palette shown (Figure 6-9); the other involves commands available from the Layer➜Align and Distribute in sub-menus.
 Before you can use either method, you need to link the layers so that you could to either align or distribute. Note that to distribute content, you first must select a minimum of three layers. After the layers have been linked or selected, the command buttons then become available to you. Then it’s just a question of deciding whether you want to use the commands from the Layer menu or the options for the Move tool for you to get centerised, flush left or right alignment.
Keep an eye on my blogs:
http://www.kreativsolutions.blogspot.com http://www.kreativsolutions-indesign.blogspot.com http://www.kreativsolutions-illustrator.blogspot.com http://www.kreativsolutions-photoshop.blogspot.com http://www.kreativsolutions-acrobat.blogspot.com Facebook link:http://www.tinyurl.com/elsontan
To move any layers up and down (sending image forward/backward) the stack is a common requirement when you’re editing images. In shortcut, moving the layer above the currently selected layer, you can press Ctrl+] (Windows), Cmd+] (MacOS). While to move the layer below the currently active layer, press Ctrl+[ (Windows), Cmd+[ (Mac OS).To move a layer to the top or the bottom of a stack, add the Shift key to the preceding key combination. Of course, these keyboard shortcuts do not allow you to move a layer below the original Background layer.
Sometimes when we have created so many layers that it can be causing us a problem to spot the one we want to work on, then we have to scroll the tiles up and down. Although this might not be the big issue while doing image manipulation, but it soon becomes the problem when you work on documents containing 40–50 layers. When you are faced with that many layers,organizing them into groups is essential. However, when time consuming, we may speed up our work flow by using the feature of colorizing layers and thereby making it easier to find them in the Layers palette when you scroll up and down.
 To colorize a layer or group, Right-click in Windows; Ctrl-click in Mac OS on the visibility icon and then select a preset color from the pop-up menu.


