skip to main |
skip to sidebar
Sometimes when we have created so many layers that it can be causing us a problem to spot the one we want to work on, then we have to scroll the tiles up and down. Although this might not be the big issue while doing image manipulation, but it soon becomes the problem when you work on documents containing 40–50 layers. When you are faced with that many layers,organizing them into groups is essential. However, when time consuming, we may speed up our work flow by using the feature of colorizing layers and thereby making it easier to find them in the Layers palette when you scroll up and down.
 To colorize a layer or group, Right-click in Windows; Ctrl-click in Mac OS on the visibility icon and then select a preset color from the pop-up menu.
The four lock icons at the top of the layer stack allow you to partially or wholly lock the layer content (Figure shown as below). Locking content can be useful, for example, when you want to paint but do not want the paint to intrude into the transparent area, or want to paint but not move the content accidentally.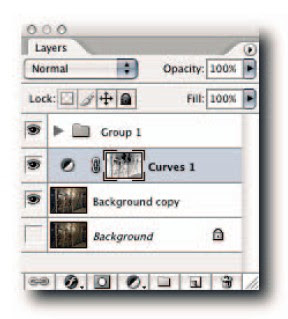
From left to right,the icons allow the following controls:
Lock Transparent Pixels—Clicking the icon locks the transparent areas on the layer—useful for filling and painting without affecting the transparent pixels on the layer.
Lock Image Pixels—Clicking the icon prevents filling and painting.You can still move, crop,and slice the content, but changing the color values is not allowed.
Lock Position—This is essentially the opposite of Lock Image Pixels. While the icon is in the down position, you may change the values of the pixels but not move them on the grid.
Lock All—Just as its name implies, clicking this icon locks the transparent areas and prevents editing and moving of all pixels on the layer. Basically,about the only thing it will permit is slicing and cropping. Take note,the icons act as toggles; click a second time to unlock. When Lock Image Pixels is selected, Lock Transparent Pixels is not available. This may seem paradoxical until you realize that the transparent areas also contain pixels (see the Tip that follows). If all the icons are grayed out, the options are not available for the current layer.
TIP: To paint transparent pixels without affecting the opaque pixels, choose the Behind blend mode in the options bar for the Brush tool.
by Shangara Singh
http://www.kreativsolutions.blogspot.com http://www.kreativsolutions-indesign.blogspot.com http://www.kreativsolutions-illustrator.blogspot.com http://www.kreativsolutions-photoshop.blogspot.com http://www.kreativsolutions-acrobat.blogspot.com Facebook link:http://www.tinyurl.com/elsontan
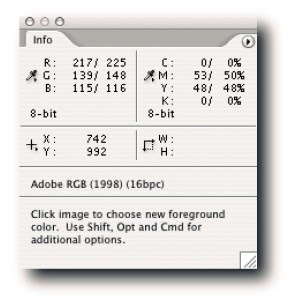
The Info palette displays color values of the pixels beneath the pointer and, depending on whichtool is currently active, measurements for tools. For example, it can provide instant feedback for color and tonal values, pointer coordinates, width and height of transforms and selections, measurements made with the Measure tool, color sampler readouts, document status information,and tool hints (Figure 3-26)—all useful information that you can gainfully employ when youmake adjustments, transforms,and edits.
The color values seen under the pointer can be displayed for the current color mode and one other mode. Being able to display values in a second color mode can be very useful when, for example,you are working in RGB mode but need to see the corresponding CMYK or Web-safe color values in order to target your adjustments. If the CMYK colors are out of the gamut of the selected color space in Color Settings, a warning in the form of an exclamation mark is displayed next to the values so that you can make adjustments accordingly.However, the warnings should not be taken as gospel but interpreted and tempered by experience. When color or tonal adjustments are applied to the image, such as Curves or Levels adjustments, the palette displays the before and after values. This again,as with seeing the values in a second color mode, can be very useful in helping you to form editing decisions based on numbers rather than a visual assessment.To view the before and after values, move the pointer into the image while the adjustment dialog box is open.
 CAUTION! If you change the units of measure in the Info palette for tracking the pointer coordinates, for example, from pixels to percentages, be aware that the settings for the rulers (Preferences➜Units & Rulers➜Units➜Rulers) are also altered.
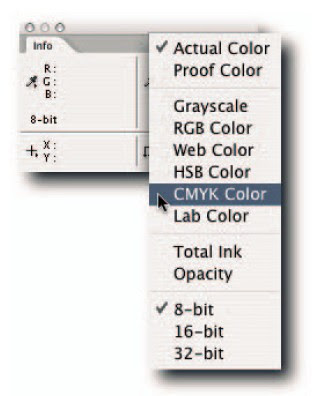
How the Info palette displays the information can be changed in two ways: You can click on the Eyedropper icons and select an item from the pop-up menu (Figure 3-27),or select Palette Options from the palette menu and then make your choices in the Info Palette Options dialog box (Figure 3-28). You can specify in the dialog box whether you would like to see document status information; this is in addition to the information displayed in the status bar; also useful,if you are a beginner, are dynamic tool hints.
By default,new history states are added from the top down: oldest history states at the top and newest at the bottom. If you select a history state,all states that follow are dimmed and then deleted when you apply an edit. The new history state is then appended below the currently selected state. This method allows new histories to be added linearly.
However,there is a downside to working in a linear history mode:When you delete a state,all states that follow will also be deleted. If you prefer to hedge your bets and keep all the history states,you can force Photoshop to work in a nonlinear history mode. In this mode,when you select a history state and apply edits to the image, the new state will be added to the bottom of the list and the states that follow the targeted state won’t be deleted. To set nonlinear history mode,choose History Options from the palette menu and then select Allow Non-Linear History.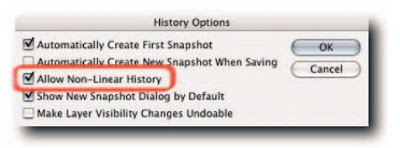
Keep an eye on my blogs:http://www.kreativsolutions.blogspot.com http://www.kreativsolutions-indesign.blogspot.com http://www.kreativsolutions-illustrator.blogspot.com http://www.kreativsolutions-photoshop.blogspot.com http://www.kreativsolutions-acrobat.blogspot.com Facebook link:http://www.tinyurl.com/elsontan
Depending on the size of your documents, histories can easily consume a large part of your resources. If you find yourself running low or even on empty, you can:
- Delete all but the topmost history state by choosing Clear History from the palette menu.
- Delete all but the topmost history state by holding down Ctrl (Windows), Cmd(Mac OS) and clicking the trash icon.
- Delete single histories by selecting and then clicking the trash icon; hold down Alt(Windows), Opt (Mac OS) if you do not want to verify the command.
- Delete single histories by selecting and then dragging to the trash.
- If you don’t fancy a trip to the History palette, you can choose Edit➜Purge➜Histories.
NOTE
If you use the Edit➜Purge➜Histories command, you cannot undo it, as youcan with the Clear History command in the History palette. What happens to the states that follow the one you have just deleted is dependent on the mode you have selected for histories in History Options—linear, the default, or nonlinear.
-- by Shangara Singh
Keep an eye on my blogs:http://www.kreativsolutions.blogspot.com http://www.kreativsolutions-indesign.blogspot.com http://www.kreativsolutions-illustrator.blogspot.com http://www.kreativsolutions-photoshop.blogspot.com http://www.kreativsolutions-acrobat.blogspot.com Facebook link:http://www.tinyurl.com/elsontan
As you apply changes to your document, the histories feature creates snapshots and stores the min RAM or on your hard disk that you have assigned as the scratch disk. Each history state is given a name to correspond with the command applied to the document. When the maximum number of history states has been reached,as specified in Preferences➜General, in order to make room for the next history state any references to the first history state is erased from the History palette, as well as from memory.However,these snapshots,or history states,are only temporary. When you close the document or quit Photoshop, all history states are erased from memory.
You might ask, what is the point of keeping snapshots of your work in progress? Well,as long asthe document is open,its history states can be accessed from the History palette and used as an aid to editing. For example,when you select a history state, the document reverts to that state—not only visually but also with respect to all other properties, such as layers and channels and visibility; these are restored.
You can make use of any one of the available history states to paint from by electing it as the source for the History Brush tool.To give another brief example,you can run the Smart Sharpen filter (Filters➜Sharpen➜Smart Sharpen) on a layer containing a portrait,select the History Brush tool,elect the previous state—thus undoing the effect of Smart Sharpen—and paint selectively over the eyes, nose, and lips from the Smart Sharpen state. This way,only the areas you paint will take on the sharpening, thus avoiding the sharpening of the skin or hair.You also have control over the opacity of the brush strokes, the blend mode, and if you employ a pen and tablet, pressure sensitivity.
-- by Shangara Singh
Keep an eye on my blogs:http://www.kreativsolutions.blogspot.com http://www.kreativsolutions-indesign.blogspot.com http://www.kreativsolutions-illustrator.blogspot.com http://www.kreativsolutions-photoshop.blogspot.com http://www.kreativsolutions-acrobat.blogspot.com Facebook link:http://www.tinyurl.com/elsontan


